
M
0
2022-11-20
MP4 | Video: h264, 1920x1080 | Audio: AAC, 44.1 KHz
Language: English | Size: 1.20 GB | Duration: 1h 10m
Urban Sketching Learn To Use Wet-On-Wet 'Direct' Watercolours And Ink
MP4 | Video: h264, 1920x1080 | Audio: AAC, 44.1 KHz
Language: English | Size: 1.20 GB | Duration: 1h 10m
Urban Sketching Learn To Use Wet-On-Wet 'Direct' Watercolours And Ink
About This Class
After the introductory lessons, that will give you all the knowledge and skills you need to get started, we'll get stuck into our final project together - an urban sketch using these loose and lively
Description
Do you want to get into watercolour and ink Urban Sketching, but aren't sure where to start? Perhaps you're already sketching, but are looking to experiment or bring something new to your style?
If so, this is the class for you!
Hi, my name is Toby Haseler, known as Toby Urbansketch on Instagram and YouTube. In this in step by step in depth tutorial I will be showing you how to use 'Direct Watercolour Painting' with simple and easy touches of ink and pen lines to produce beautiful, expressive and light-filled urban sketches.
'What is direct watercolour sketching?' I hear you ask! And why use it?
Well, direct watercolour sketching is the process of sketching, with watercolours, directly onto your paper. No pencil lines, no ink, just straight in their with your brush.
I know this sounds scary, risky or difficulty - but I can only assure you that it isn't. It's simple, fun and expressive. As long as we maintain our basic principles of simplification, finding and sketching out key shapes, and leaving details to the end.
Loose wet-on-wet watercolour painting is the key to this style.
In fact, by using a wet on wet approach, where we apply our wet watercolour paints to a wet page - for example by spraying it, or brushing it down with water prior to painting - we produce a dream like and fluid quality in our sketching.
Ink and pen lines bring the art together too
In traditional watercolour painting, we work from loose light filled washes, and gradually build up layers until we get to those final details - painting with a small brush and thick paint to bring structure to our sketch.
In urban sketching we are often looking for short cuts, those hints and tips that take traditional art and make it quicker, more agile and easier to do on the go. And touches of ink on top of our watercolours is exactly that, a quick, easy and fun way to bring structure to your loose colours and produce amazing art.
What are the benefits to this style?
I love using wet on wet watercolour painting in all my urbansketching! Whether I'm sketching with ink, pencil, pen or just watercolours. For me, it has some clear benefits and I'd love you to join me in this class, so I can show you why I love it!
It's fun
It's quick
Watercolours can produce amazing textures using this technique
It gives my sketches character
It's uniqueand recognisable
It helps me developkey simplification skills
It lets me beloose and experimental
Did I mention it's fun!
We will cover everything you need to know to get started with this style
The basics of brush choice
How tosimplify your scene and see shapes
How to add variety to your watercolour washes
How to get started with wet on wet paintain
Bring structure with simple and meaningful ink lines
And a full, step by step guide on producing your final project as I sketch and paint alongside you!
This class is a fun introduction into the use of watercolour painting in urban sketching, to not just capture light-filled dreamy scenes. But also to make it simple and approachable, demystifying the process of watercolour fine art, and bringing it to a quick and easy sketching format.
If there is a secret, then that secret is seeing shapes. By starting with simple shapes we avoid overworking or overcomplicating our sketch.
With watercolours you have to trust in the process, don't panic, and believe that simplicity and expressivity is the way to go - if you can manage that state of mind then you're 80% of the way towards something beautiful.
At the end, we bring our sketch together with some really simple line work. In fact, less is more in this style. There is so much beauty in the natural textures of our watercolours that the magic now is in avoiding overworking them at the end.
Goals of this class, what I think you'll achieve!
Understandinghow and why to simplify our sketches
Gain confidence in using watercolour sketching directly on our page
Understand and experiment with different types of pen/ink to produce different sketch effects
Develop aloose and expressive watercolor style, to complement our sketching
Enjoy the process and have fun!
This class is suitable to all levels.
For beginners, we cover the basics of shape, equipment and brush selection.
For intermediate or advanced sketchers, this style in interesting and fluid, and might be something you could explore as part of developing your own style.
Direct watercolour sketching, using a wet on wet approach, and ink as a shortcut to structure and detail is perfect for urban sketching.
No matter whether it's buildings, markets, people or anything else in front of you. It challenges you to simplify scenes, to interpret them rather than spend hours putting in every last detail. And the process can be so freeing, fun and easy when you just build up a bit of experience and confidence.
Focusing on what is important in a scene, the shape and feel of what's in front of you and just a few relevant details means your sketching is quicker, more focused, and (at least in my opinion) more fun. And this is everything that urban sketching is about.
Whats in this class?
We will cover the basics of equipment that you need for you sketches, including watercolours, pens and paper and more!
We will try a few exercises to get used to direct watercoour painting.
We will, of course, look at how to identify shapes in an image.
Then we will practice adding ink and see how our scene comes to life.
Finally, there is a full, step-by-step worked through and real time sketch with me - you can find the reference in the class resources and join in OR watch along and use it as a guide for your own final project.
Project Guide
After the introductory lessons, that will give you all the knowledge and skills you need to get started, we'll get stuck into our final project together - an urban sketch using these loose and lively watercolour painting techniques, and bringing it all together with a touch of ink.
I'll go through a full scene, and you can use that as your final project OR please feel free to show of your local town, or somewhere or something that you're excited to sketch and paint.
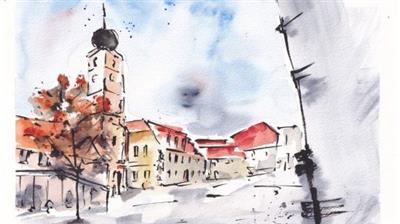
The reference is in the resources for you to download, it's a photo from Sibiu - a beautiful town in Romania where I was fortunate enough to be on holiday. The architecture, shapes and colours are just beautiful and this scene is a lot of fun to sketch.
Step One - Painting our shapes using wet on wet watercolours
The first step is to get our shapes on the page. We'll consider the composition of the scene, and in this sketch we will also use a compositional trick to fill our page, create drama and fill a 'gap' in our reference image.
The basic shapes are sketched using the principles we learned about. Watercolours added directly to a wet page, then blended and moved beautifully, whilst leaving plenty of white space and drama on the page.
Don't panic at this stage, it's supposed to look messy - that is the beauty and fun of watercolour painting.
Step two - The ink
Using whatever your preferred pen is - permanent or soluble ink - you'll now add structure to those beautiful shapes and textures the watercolour paints have created.
The biggest tip here is not to panic, not to overwork it.
Less is often more! Keeping it easy and simple will allow the watercolours to sing through.
Step 3 - Add details and final touches
The next step is to quickly add some bold colours, little details, textures and perhaps tone and shadows to our sketch with our pen and colours.
We look around the sketch and decided where wants more colour, more pen, more lines and we gently add these in.
Remember to keep distance from your sketch - you can always stop and add more, but you can take anything away once it's down and dried on the page
Overview
Lesson 1:Introduction
Lesson 2:Gallery of Example Sketches
Lesson 3:Supplies you might need
Lesson 4:Which Brush is Best? - A practical guide
Lesson 5:Thinking in Shapes
Lesson 6:Wet-on-Wet and Varied Watercolour Washes
Lesson 7:Add Ink for Structure
Lesson 8:Step one - Direct Watercolours
Lesson 9:Step two - Ink Structure
Lesson 10:Step three - Final Touches
Lesson 11:Your Project Explained
Download link
rapidgator.net:
You must reply in thread to view hidden text.
uploadgig.com:
You must reply in thread to view hidden text.
1dl.net:
You must reply in thread to view hidden text.
")