
O
0
Published 12/2022
MP4 | Video: h264, 1280x720 | Audio: AAC, 44.1 KHz
Language: English | Size: 1.67 GB | Duration: 1h 22m
Instructions for Other Table Accents Created Using 20 Brushes Included
MP4 | Video: h264, 1280x720 | Audio: AAC, 44.1 KHz
Language: English | Size: 1.67 GB | Duration: 1h 22m
Instructions for Other Table Accents Created Using 20 Brushes Included
What you'll learn
Students will learn the step-by-step method for adding shadow and highlight from a birds-eye view
Students will learn tips for creating an interesting composition from the components built
Students will learn extensive use of the Gaussian blur for smooth transitions
Students will learn methods for keeping the art fully editable for later adjustments and recoloring
Requirements
No pre-requisite but basic Procreate knowledge is an asset
Description
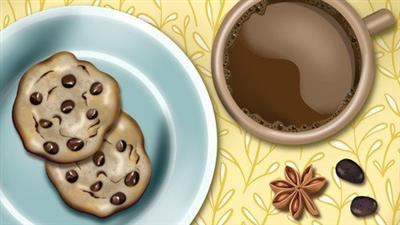
Comfort can never be taken for granted. The weather was cool and damp when I decided to make this project, and every time I looked at the artwork it cheered me up and made me feel warm and fuzzy inside! Who doesn't love hot cocoa and chocolate chip cookies! Producing an illustration like this helps you to learn how to observe your subject keenly and work with reference. I try to guide you through all of that as we work our way through, starting with the cup of cocoa. You will gain confidence in using selections, clipping masks and textures.This new class, Create a Flat Lay Hot Cocoa & Cookies in Procreate, will show you some of my illustration methodology as you follow me step-by-step through the process of creating this flat lay. Of course, I will also give you a bunch of brushes so you can do the complete project. And, I have techniques to help you create this same scene but have it unique to you. That was one of my main goals as I put this class together. I can see many follow up classes in the future to compliment this.In this class I'll walk you through:my step-by-step method for adding shadow and highlight from a birds-eye viewtips for creating an interesting composition from the components we buildmy workflow for use of layers and other great features clipping masks for shading and highlightsmuch use of the Gaussian blur for smooth transitionsmethods for keeping the art fully editable for later adjustments and recoloringI know you will be licking your lips when you start looking at this project and you will be able to really put your own slant on it. I provide several patterns you can use for your tablecloth, and you can, of course, use one of your own patterns. I can't wait to see the diversity that will surely manifest itself!The key concepts I will include:review of brush making and adjusting as dictated by this documenta look highlights and shadows from a bird's eye perspectiveapproaches you can take to make this design your ownAs you develop as an illustrator, you will find that challenging yourself is so satisfying! Learning new Procreate workflows is always desirable. I know you will create something amazing and delicious. Maybe you will think of other props I didn't!Intro to Create a Flat Lay Hot Cocoa & Cookies in ProcreateThis short intro will give you an overview of the class.Lesson 1: Overview and Starting the CupIn this lesson, I will give an overview of the document set-up, show you the reference and we even start on the drawing of the cup of cocoa. I will show you how to add the highlights and shadows to the rim and handle and share a few pointers along the way.Lesson 2: Cocoa with Highlights and FoamIn this lesson, I will break down the complete process of adding highlights and shadows to the cocoa. We will ready the foam layer as well. This is a good opportunity to develop our ability to visualize and add highlights and shadows to really suggest dimension.Lesson 3: Adding the Foam BubblesIn this lesson, I will explain the creation of our bubble stamp brush. I outline settings and sizing of the brushes in relation to the look we are trying to achieve. I will show you some of the key techniques I use and explain every step of the way. By the end of the lesson, you will have the a couple of bubbles that will help give variety to the foam and bubbles.Lesson 4: Starting the Chocolate Chip CookieWe will start on our cookie shape in this lesson. I explain how to create the over-all shape and then how to paint the individual chocolate chips to make them dimensional and realistic. I also explain how to add a highlight to make it look shiney.Lesson 5: Finishing the Chocolate Chip CookieIn this lesson, we will be finalizing the cookie by adding much more texture, detail, and dimension. I show you the use of the brushes I have included in the set. We also explore blend modes to keep the details looking like they belong. I also speak to your color choices here.Lesson 6: Cookie Details and Creating the Cocoa BeanOur last prop we will be creating for our flat-lay scene is the cocoa bean. We will be using many of the same techniques as when we created the cookies, as well as a couple of the same brushes. I show you how to use airbrushing to add highlights and shadows. We are one step closer to completing out layout.Lesson 7: Tablecloth and Arranging the ElementsAdding some of the finishing touches is the focus of this lesson. I will be adding all the props and accents into the piece and then further enhancing all the foreground items with a highlights and shadows. I speak to sizing and position of the objects as well. All we need now is the tablecloth which we will do in the next lesson.Lesson 8: Tablecloth, Dimension, and Final DetailsIn this lesson, I will show you how to use the pattern brushes which are included to create a lovely tablecloth. I show you several options and explain methods by which you can change some of the colors, sizes, and details. I show you how to add subtle shadows to make the whole flat lay look more realistic, as well as highlights.Lesson 9: Conclusion and Wrap UpI will show you how my project turned out and what you can do now, moving forward.Concepts covered:Concepts covered include but are not limited to Procreate flat lay design, Procreate Patterns with brushes, layering, transparency, Procreate brush stamps, Procreate canvas settings, brush settings, Procreate snapping and guides, Procreate bubble brush creation, creating shine, highlights and shadows, the Brush Studio in Procreate, adjusting Procreate brushes, sizing of documents and brushes, compositions with brush stamps, adding texture with brushes, procreate brushes for adding other interesting details, workflow best practices, painting best practice, Procreate composites, techniques with paints and blending, and much more.You will get .1 hour and 23 minutes of direction from an instructor who has been in graphic design business and education for over 40 yearsknowledge of multiple ways to solve each design challengea set of 20 brushes, a color palette and moreProject DescriptionChallenge yourself today and download and install the Procreate brushes provided to get started on your flat lay. Find some good reference and save to your camera roll. Work through each of the lessons, applying the concepts as I teach them. Try to create at least one brush, and experiment with changing settings on the brushes provided.
Overview
Section 1: Introduction
Lecture 1 Overview and Starting the Cocoa Cup
Lecture 2 Cocoa with Highlights and Foam
Lecture 3 Adding the Foam Bubbles
Lecture 4 Starting the Chocolate Chip Cookie
Lecture 5 Finishing the Chocolate Chip Cookie
Lecture 6 Cookie Details and Creating the Cocoa Bean
Lecture 7 Tablecloth and Arranging the Elements
Lecture 8 Tablecloth, Dimension, and Final Details
Lecture 9 Closing Thought and Wrap Up
Procreate users who wish to develop as an illustrator and wish to challenge themselves with learning new techniques.
rapidgator.net:
You must reply in thread to view hidden text.
uploadgig.com:
You must reply in thread to view hidden text.
nitroflare.com:
You must reply in thread to view hidden text.
")