




Welcome to Katz - Pinoy Underground Forum

Join us now to get access to all our features. Once registered and logged in, you will be able to create topics, post replies to existing threads, give reputation to your fellow members, get your own private messenger, and so, so much more. It's also quick and totally free, so what are you waiting for?
  • Compact Safety Notice
  • Weekly Grants Lottery is live! Win a 20,000 ₪ jackpot — tickets are just 30 ₪, drawn every week. Buy your tickets »

WATCH How To Make Your Raspberry Pi Speak

R 6.2K

rmjronz

Corporal
Ardent
Member
Access
Ardent
Member
Access
Fan Favorite
4 Year Silver Member 4y Silver
Joined
Aug 22, 2021
Messages
518
Reaction score
2,685
Points
93
Location
tagum city
grants
₲8,767

Introduction: Make Your Raspberry Pi Speak!

Sometimes your robot just wants to talk! This tutorial will show you how to make your Raspberry Pi speak aloud. We will use a software package called Espeak to convert text (or strings) into spoken words, out loud, on your robot. We show you three examples:

Materials You’ll Need

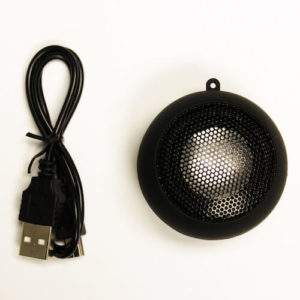
To make the Raspberry Pi Speak you need the speaker-speaker_and_usb_cable


Dexter Industries Speakers​

Software

This tutorial uses python3. It can be adapted to earlier versions of python.

Connections

  • Make sure your Raspberry Pi is powered up and connected to your network.
  • Connect the speaker to the audio jack as shown in the image.
To make the Raspberry Pi speak and read some text aloud, we need a software interface to convert text to speech on the speakers. For this we need a Text To Speech engine. The TTS engine we are using in this tutorial is Log in or register to view links. The voice may be a little robotic, however it runs offline which is an added plus.

First let’s test if the audio is working on the Raspberry Pi. Run the following command:

aplay /usr/share/sounds/alsa/*
If you are able to hear the sounds like “Front Center”,”Front Left”, “Front Right” and so on, your sound is working!

Next, install eSpeak. Run the following in terminal to install espeak:

sudo apt-get install espeak
Get the Raspberry Pi Speaking from the Command Line

After eSpeak has been successfully installed on the Raspberry Pi, run the following command to test eSpeak:

espeak "Text you wish to hear back" 2>/dev/null
For example:

espeak "Hello World" 2>/dev/null
You should hear “Hello World” from the speakers. Your Raspberry Pi is speaking!

Using Python to Make Your Raspberry Pi Speak

Now building on top of these commands you can create Python programs that speak words. Log in or register to view links:

Running the Example Programs:

Counting Numbers

Connect your Pi to the internet. You will need to download and install the num2words Python package to convert the numbers to strings. This will convert an integer value to a string, which are then read aloud by the Raspberry Pi. Use the following command:

sudo pip3 install num2words
Go to the folder where you have copied the examples and run the following command:

sudo python3 speak_count.py
Enter a number and you should hear a voice saying “Count Down Starts”, then you should hear numbers counted down from the entered number.
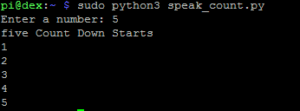
Your Raspberry Pi is Speaking


Speaking Commands

Run the program “speak_text.py” in the command line:

sudo python3 speak_text.py
When prompted, enter some text you wish to hear back. You should see the text you have entered and you will hear it back through your speakers!

Sample output is shown below.

Your Raspberry Pi is Speaking Twinkle Twinkle LIttle Star


As a bonus, this example also records the voice to a file named Text.wav.

Run the following commands to hear back the recorded voice.

aplay /home/pi/Desktop/Text.wav

A Deeper Dive on Raspberry Pi Speech: More Options​

Modifying the Voice

The Espeak package provides a few good variations to the default voice used to speak out the text. The software supports Log in or register to view links and a few of them are shown below. The syntax is “-v<voice filename>” For example, we can use an American accent with “en-us”:

espeak -ven-us "Welcome to Dexter tutorial" 2>/dev/null
Or we can use a French accent with “fr”:

espeak -vfr "Ce tutoriel de Dexter vous souhaite la bienvenue" 2>/dev/null
Or we can speak Spanish with the Raspberry Pi using the term “es”:

espeak -ves "Bienvenido al tutorial de Dexter" 2>/dev/null
Voices

You can also specify a male voice, or a female voice. You can choose between a few different male voices :+m1,+m2,+m3,+m4,+m5,+m6,+m7. For example, we can speak in male voice five:

espeak -ven+m5 "Welcome to Dexter tutorial" 2>/dev/null
You can also use female voices: +f1,+f2,+f3,+f4. For example, we can speak in female voice four:

espeak -ven+f4 "Welcome to Dexter tutorial" 2>/dev/null
You can also modify a few other aspects of the voice with +croak, +whisper. For example, we can whisper:

espeak -ven+whisper "Welcome to Dexter tutorial" 2>/dev/null
Modifying Speech Speed

The “-s” parameter controls the speed of reading a single word. It sets the speed in words-per-minute. The default value is 175. I generally use a faster speed of 260. The lower limit is 80. There is no upper limit, but about 500 is probably a practical maximum. We can set the word speed like this:

Fast at 300 words per minute:

espeak -s250 "Welcome to Dexter tutorial" 2>/dev/null
Or slow at 80 words per minute:

espeak -s80 "Welcome to Dexter tutorial" 2>/dev/null
Pause Between Words

We can use the “-g” to pause between words; the “g” stands for “word gap”. This option inserts a pause between words. The value is the length of the pause, in units of 10 ms (at the default speed of 170 wpm). A fast pause:

espeak -g10 "Welcome to Dexter tutorial" 2>/dev/null
A slow pause with 100 ms between words:

espeak -g180 "Welcome to Dexter tutorial" 2>/dev/null
There are lot more options available with the eSpeak package you can review Log in or register to view links.


Questions About Your Speaking Raspberry Pi?​

You can use these examples to build your own TTS powered projects and make the Raspberry Pi Speak. Please share any interesting projects that you build with us on the forums Log in or register to view links!

Learn More!​

If you liked our tutorial, consider getting the Log in or register to view links, Log in or register to view links, Log in or register to view links to try it out yourself!

EDUCATORS​

Check out our Log in or register to view links page to learn about our Classroom Kits, Curriculum and Teacher Trial program.
 
  • Like
  • Love
Reactions: siliatsal, jamiesmith362, murderhouse and 5 others
K 1.2M

KatzSec DevOps

Alpha and Omega
Staff member
Moderator
Philanthropist
Access
Moderating
Philanthropist
Access
Top Contributor
Community Legend
4 Year Silver Member 4y Silver
Joined
Jan 17, 2022
Messages
1,180,345
Reaction score
12,287
Points
113
grants
₲1,228
rmjronz Next time always upload your files sa https://dl.katz.to para siguradong di ma dedeadlink. *Please Disable your adblock when visiting katz.to to keep us running forever.
 
M 1K

markkkkkk31

Fancier
Member
Access
Member
Access
4 Year Silver Member 4y Silver
Joined
Feb 5, 2022
Messages
778
Reaction score
18
Points
18
Age
35
Location
manila
grants
₲2,180

Introduction: Make Your Raspberry Pi Speak!

Sometimes your robot just wants to talk! This tutorial will show you how to make your Raspberry Pi speak aloud. We will use a software package called Espeak to convert text (or strings) into spoken words, out loud, on your robot. We show you three examples:

Materials You’ll Need

To make the Raspberry Pi Speak you need the speaker-speaker_and_usb_cable


Dexter Industries Speakers​

Software

This tutorial uses python3. It can be adapted to earlier versions of python.

Connections

  • Make sure your Raspberry Pi is powered up and connected to your network.
  • Connect the speaker to the audio jack as shown in the image.
To make the Raspberry Pi speak and read some text aloud, we need a software interface to convert text to speech on the speakers. For this we need a Text To Speech engine. The TTS engine we are using in this tutorial is Log in or register to view links. The voice may be a little robotic, however it runs offline which is an added plus.

First let’s test if the audio is working on the Raspberry Pi. Run the following command:

aplay /usr/share/sounds/alsa/*
If you are able to hear the sounds like “Front Center”,”Front Left”, “Front Right” and so on, your sound is working!

Next, install eSpeak. Run the following in terminal to install espeak:

sudo apt-get install espeak
Get the Raspberry Pi Speaking from the Command Line

After eSpeak has been successfully installed on the Raspberry Pi, run the following command to test eSpeak:

espeak "Text you wish to hear back" 2>/dev/null
For example:

espeak "Hello World" 2>/dev/null
You should hear “Hello World” from the speakers. Your Raspberry Pi is speaking!

Using Python to Make Your Raspberry Pi Speak

Now building on top of these commands you can create Python programs that speak words. Log in or register to view links:

Running the Example Programs:

Counting Numbers

Connect your Pi to the internet. You will need to download and install the num2words Python package to convert the numbers to strings. This will convert an integer value to a string, which are then read aloud by the Raspberry Pi. Use the following command:

sudo pip3 install num2words
Go to the folder where you have copied the examples and run the following command:

sudo python3 speak_count.py
Enter a number and you should hear a voice saying “Count Down Starts”, then you should hear numbers counted down from the entered number.

Your Raspberry Pi is Speaking


Speaking Commands

Run the program “speak_text.py” in the command line:

sudo python3 speak_text.py
When prompted, enter some text you wish to hear back. You should see the text you have entered and you will hear it back through your speakers!

Sample output is shown below.

Your Raspberry Pi is Speaking Twinkle Twinkle LIttle Star


As a bonus, this example also records the voice to a file named Text.wav.

Run the following commands to hear back the recorded voice.

aplay /home/pi/Desktop/Text.wav

A Deeper Dive on Raspberry Pi Speech: More Options​

Modifying the Voice

The Espeak package provides a few good variations to the default voice used to speak out the text. The software supports Log in or register to view links and a few of them are shown below. The syntax is “-v<voice filename>” For example, we can use an American accent with “en-us”:

espeak -ven-us "Welcome to Dexter tutorial" 2>/dev/null
Or we can use a French accent with “fr”:

espeak -vfr "Ce tutoriel de Dexter vous souhaite la bienvenue" 2>/dev/null
Or we can speak Spanish with the Raspberry Pi using the term “es”:

espeak -ves "Bienvenido al tutorial de Dexter" 2>/dev/null
Voices

You can also specify a male voice, or a female voice. You can choose between a few different male voices :+m1,+m2,+m3,+m4,+m5,+m6,+m7. For example, we can speak in male voice five:

espeak -ven+m5 "Welcome to Dexter tutorial" 2>/dev/null
You can also use female voices: +f1,+f2,+f3,+f4. For example, we can speak in female voice four:

espeak -ven+f4 "Welcome to Dexter tutorial" 2>/dev/null
You can also modify a few other aspects of the voice with +croak, +whisper. For example, we can whisper:

espeak -ven+whisper "Welcome to Dexter tutorial" 2>/dev/null
Modifying Speech Speed

The “-s” parameter controls the speed of reading a single word. It sets the speed in words-per-minute. The default value is 175. I generally use a faster speed of 260. The lower limit is 80. There is no upper limit, but about 500 is probably a practical maximum. We can set the word speed like this:

Fast at 300 words per minute:

espeak -s250 "Welcome to Dexter tutorial" 2>/dev/null
Or slow at 80 words per minute:

espeak -s80 "Welcome to Dexter tutorial" 2>/dev/null
Pause Between Words

We can use the “-g” to pause between words; the “g” stands for “word gap”. This option inserts a pause between words. The value is the length of the pause, in units of 10 ms (at the default speed of 170 wpm). A fast pause:

espeak -g10 "Welcome to Dexter tutorial" 2>/dev/null
A slow pause with 100 ms between words:

espeak -g180 "Welcome to Dexter tutorial" 2>/dev/null
There are lot more options available with the eSpeak package you can review Log in or register to view links.

Questions About Your Speaking Raspberry Pi?​

You can use these examples to build your own TTS powered projects and make the Raspberry Pi Speak. Please share any interesting projects that you build with us on the forums Log in or register to view links!

Learn More!​

If you liked our tutorial, consider getting the Log in or register to view links, Log in or register to view links, Log in or register to view links to try it out yourself!

EDUCATORS​

Check out our Log in or register to view links page to learn about our Classroom Kits, Curriculum and Teacher Trial program.
ganda nito sir, salamat po sa guide
 
L 0

lumbay22

Corporal
BANNED
Member
Access
Banned
Joined
Jul 12, 2022
Messages
612
Reaction score
29
Points
28
Location
kahit saan
grants
₲1,821

Introduction: Make Your Raspberry Pi Speak!

Sometimes your robot just wants to talk! This tutorial will show you how to make your Raspberry Pi speak aloud. We will use a software package called Espeak to convert text (or strings) into spoken words, out loud, on your robot. We show you three examples:

Materials You’ll Need

To make the Raspberry Pi Speak you need the speaker-speaker_and_usb_cable


Dexter Industries Speakers​

Software

This tutorial uses python3. It can be adapted to earlier versions of python.

Connections

  • Make sure your Raspberry Pi is powered up and connected to your network.
  • Connect the speaker to the audio jack as shown in the image.
To make the Raspberry Pi speak and read some text aloud, we need a software interface to convert text to speech on the speakers. For this we need a Text To Speech engine. The TTS engine we are using in this tutorial is Log in or register to view links. The voice may be a little robotic, however it runs offline which is an added plus.

First let’s test if the audio is working on the Raspberry Pi. Run the following command:

aplay /usr/share/sounds/alsa/*
If you are able to hear the sounds like “Front Center”,”Front Left”, “Front Right” and so on, your sound is working!

Next, install eSpeak. Run the following in terminal to install espeak:

sudo apt-get install espeak
Get the Raspberry Pi Speaking from the Command Line

After eSpeak has been successfully installed on the Raspberry Pi, run the following command to test eSpeak:

espeak "Text you wish to hear back" 2>/dev/null
For example:

espeak "Hello World" 2>/dev/null
You should hear “Hello World” from the speakers. Your Raspberry Pi is speaking!

Using Python to Make Your Raspberry Pi Speak

Now building on top of these commands you can create Python programs that speak words. Log in or register to view links:

Running the Example Programs:

Counting Numbers

Connect your Pi to the internet. You will need to download and install the num2words Python package to convert the numbers to strings. This will convert an integer value to a string, which are then read aloud by the Raspberry Pi. Use the following command:

sudo pip3 install num2words
Go to the folder where you have copied the examples and run the following command:

sudo python3 speak_count.py
Enter a number and you should hear a voice saying “Count Down Starts”, then you should hear numbers counted down from the entered number.

Your Raspberry Pi is Speaking


Speaking Commands

Run the program “speak_text.py” in the command line:

sudo python3 speak_text.py
When prompted, enter some text you wish to hear back. You should see the text you have entered and you will hear it back through your speakers!

Sample output is shown below.

Your Raspberry Pi is Speaking Twinkle Twinkle LIttle Star


As a bonus, this example also records the voice to a file named Text.wav.

Run the following commands to hear back the recorded voice.

aplay /home/pi/Desktop/Text.wav

A Deeper Dive on Raspberry Pi Speech: More Options​

Modifying the Voice

The Espeak package provides a few good variations to the default voice used to speak out the text. The software supports Log in or register to view links and a few of them are shown below. The syntax is “-v<voice filename>” For example, we can use an American accent with “en-us”:

espeak -ven-us "Welcome to Dexter tutorial" 2>/dev/null
Or we can use a French accent with “fr”:

espeak -vfr "Ce tutoriel de Dexter vous souhaite la bienvenue" 2>/dev/null
Or we can speak Spanish with the Raspberry Pi using the term “es”:

espeak -ves "Bienvenido al tutorial de Dexter" 2>/dev/null
Voices

You can also specify a male voice, or a female voice. You can choose between a few different male voices :+m1,+m2,+m3,+m4,+m5,+m6,+m7. For example, we can speak in male voice five:

espeak -ven+m5 "Welcome to Dexter tutorial" 2>/dev/null
You can also use female voices: +f1,+f2,+f3,+f4. For example, we can speak in female voice four:

espeak -ven+f4 "Welcome to Dexter tutorial" 2>/dev/null
You can also modify a few other aspects of the voice with +croak, +whisper. For example, we can whisper:

espeak -ven+whisper "Welcome to Dexter tutorial" 2>/dev/null
Modifying Speech Speed

The “-s” parameter controls the speed of reading a single word. It sets the speed in words-per-minute. The default value is 175. I generally use a faster speed of 260. The lower limit is 80. There is no upper limit, but about 500 is probably a practical maximum. We can set the word speed like this:

Fast at 300 words per minute:

espeak -s250 "Welcome to Dexter tutorial" 2>/dev/null
Or slow at 80 words per minute:

espeak -s80 "Welcome to Dexter tutorial" 2>/dev/null
Pause Between Words

We can use the “-g” to pause between words; the “g” stands for “word gap”. This option inserts a pause between words. The value is the length of the pause, in units of 10 ms (at the default speed of 170 wpm). A fast pause:

espeak -g10 "Welcome to Dexter tutorial" 2>/dev/null
A slow pause with 100 ms between words:

espeak -g180 "Welcome to Dexter tutorial" 2>/dev/null
There are lot more options available with the eSpeak package you can review Log in or register to view links.

Questions About Your Speaking Raspberry Pi?​

You can use these examples to build your own TTS powered projects and make the Raspberry Pi Speak. Please share any interesting projects that you build with us on the forums Log in or register to view links!

Learn More!​

If you liked our tutorial, consider getting the Log in or register to view links, Log in or register to view links, Log in or register to view links to try it out yourself!

EDUCATORS​

Check out our Log in or register to view links page to learn about our Classroom Kits, Curriculum and Teacher Trial program.
salamat po dito dagdag satisfaction sa curiosity and knowledge na din keep! <3
 
Top Bottom