
O
0
Published 12/2022
MP4 | Video: h264, 1280x720 | Audio: AAC, 44.1 KHz
Language: English | Size: 1.47 GB | Duration: 1h 10m
Stock Your Asset Studio with Elements You Can Use Over and Over
MP4 | Video: h264, 1280x720 | Audio: AAC, 44.1 KHz
Language: English | Size: 1.47 GB | Duration: 1h 10m
Stock Your Asset Studio with Elements You Can Use Over and Over
What you'll learn
Learn the step-by-step process for auto tracing with Adobe Capture, a free app
Learn how to use clipping masks to add textures to your assets
Learn how to create vector pattern files to add to your assets
Learn layering, color and design considerations in Affinity Designer
Requirements
Affinity Designer Beginner Classes are an asset
Description
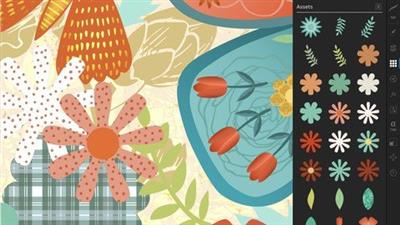
This class, Building a Robust Asset Studio in Affinity Designer, is the first in a second 3-part series to introduce you the Asset Studio and the creation of an intricate, layered, multi-faceted illustration. This class will illustrate the use of a symbol to create a symmetrical mirrored layout. I will be using a butterfly image as inspiration, and I will show you tons of inspiration. We create a bunch of flowers as well as other assets we deem usable for our final illustration. This first class in the series explores multiple methods for creating these assets. Of course, I am going to tie in plenty of tips and tricks to make it challenging for you. The great thing is, by the end of the class, you will all the info you need to produce assets of your own to fill your Asset Studio.I take you step-by-step through the whole process of auto-tracing as well, and I cover 3 methods for doing so, all free. Auto tracing is the basis for adding originally raster images, such as those done in Procreate, to your Affinity Designer Asset Studio as vectors. The Asset Studio is what makes the production of a series, or collection, attainable. The cool thing is that we can use the Asset Studio any time we open a new document. It travels with the program, and I will show you how to accomplish that. At the end of the three classes, you will have a professional illustration that can not only be enlarge beautifully but could also be the start of a beautiful collection for you.In this class I'll walk you through:my step-by-step method for auto tracing with Adobe Capturefree programs such as Vectornator and online converter to vectorizehow to use clipping masks to add textures to your assetscreating vector pattern files to add to your assetslayering, color and design considerationsThis class will reinforce everything you have learned thus far with Affinity, and my guidance will help you through any challenges that crop up. I strongly believe the class will benefit anyone looking to add vector illustration to their list of skills and accomplishments.The key concepts I will include:thinking and planning ahead when faced with a challenging projectpre-planning that will make the production of assets possibleefficiency with all aspects of vector art productionLearning another Affinity Designer skill is valuable, even if you are not sure what you will use the vector art for! Learning vector software workflows is essential in our profession and are deeply important for you to learn. We will do it, step-by-step, and this class will further reinforce all the Affinity Designer theory which is difficult to learn in isolation.Intro to Building a Robust Asset Studio in Affinity DesignerThis short intro will give you an overview of the class.Lesson 1: Overview and Layered Art that InspiresIn this lesson I will show you a ton of inspiration. I explain what style we are trying to achieve and introduce you to some wildly successful licensed artists.Lesson 2: Using the Asset Studio InterfaceIn this lesson, I will show you all the ins and outs of the Asset Studio. I explain all the menu items and demonstrate their use. We create and add an asset, so you see all the steps. I explain how you can adapt symbols you have to add those to the assets. The beauty of the asset studio is that it will be present in all future documents. It is worth the time to create a robust asset collection.Lesson 3: Raster and Vector Pattern ImportThis lesson is about importing patterns that we will later use in our composition. We create the pattern from scratch in Procreate, then auto trace it in Adobe Capture. I explain the Adobe Capture interface and considerations when tracing. We then import both raster and vector patterns and compare the quality when enlarging. Finally, we add these patterns to our asset library. In a later lesson, I will show you alternatives to Adobe Capture.Lesson 4: Flowers in Procreate vs AffinityI do a comparative analysis of the two methods for creating vectors. As we work our way through, I demonstrate this, then we do some fun experiments. I will show you how to add patterns to the motifs. I also show you how to make color adjustments using blend modes.Lesson 5: Other Asset Creation StrategiesIn this lesson, I will show you numerous other ways to create assets. You will use the transform studio in this lesson to repeat motifs in a circular pattern. I show you how to alter a repeated petal in several different ways by importing textures and changing the colors. We add several new assets to our Asset Studio in this lesson.Lesson 6: Rounding Out our Asset CollectionIn this lesson, I show you 2 alternate methods to create the tracing for vectors so that you can choose which one is best for you. I also explain why I strongly believe batching is the best way to round out your collection quickly, so that's what this lesson is all about.Lesson 7: Game Plan for Next Class and Wrap UpThis lesson is about inspiration and we will discuss plans for the next class in the series.Lesson 8: Conclusion and Wrap UpWe will conclude everything in this lesson. I show you alternate method for getting vectors. I talk about what I think is so great about Affinity Designer and we end with a chat about next steps.Concepts covered:Concepts covered include but are not limited to the Affinity Designer Asset Studio, Affinity Designer Vector Persona, Affinity Designer Raster Persona, layering, Affinity Designer Symbol Studio, Affinity Designer Transform Studio, Affinity Designer canvas settings, importing and applying textures, Affinity Designer composites, Affinity Designer Color Studio, shapes, color swatches and importing colors, texture fills, and much more.You will get.65.5 minutes of direction from an instructor who has been in graphic design business and education for over 40 yearsknowledge of multiple ways to solve each design challengeintroduction to a new illustration techniqueProject DescriptionWith today's project, I'd like to see you create a great collection of assets you can see using for this project and many more. Take and convert some of the symbols you created in the last two classes. Follow all the instructions in the classes to try each technique and judge what is the most efficient for you. Once complete, try using it on a mock-up! Check out the moackups on my Artist Resources tab of my website.
Overview
Section 1: Introduction
Lecture 1 Overview and Layered Art that Inspires
Lecture 2 Using the Asset Studio Interface
Lecture 3 Raster and Vector Pattern Import
Lecture 4 Flowers in Procreate vs Affinity
Lecture 5 Other Asset Creation Strategies
Lecture 6 Rounding Out our Asset Collection
Lecture 7 Lesson 7 Game Plan for Next Class and Wrap Up
Lecture 8 Conclusion and Wrap Up
iPad users looking to work in a vector environment to create repeat patterns,This class was produced in Affinity Designer 1 but works in AD2

Download link
rapidgator.net:
You must reply in thread to view hidden text.
uploadgig.com:
You must reply in thread to view hidden text.
nitroflare.com:
You must reply in thread to view hidden text.
")